Tuesday, November 16, 2010

Flæskesvær!

It's all about the crunch !!

This Danish snack called "Flæskesvær" is made from pigs skin and is a Danish tradition- it's crunchy, tasty and really fattening! But it's almost Christmas time, so let's knock ourselves out with a handful of handmade Flæskesvær!


 How to make them?

Cut pigs skin in thin slices and boil them in water with added salt, bayleaves and chilli. Boil them for about 20-25 minuttes, drain them and pat them dry with a dishtowel and put them in a baking tray with salt sprinkled over then, put the tray  in the oven at 180-200 degrees for about 20-30 minuttes. Drain excess fat from time to time. Make sure the Flæskesvær arent baked too little ( or they'll go chewy and not crunchy- and not tool long or they'll have a burned taste and a too dry texture.


Monday, July 19, 2010

Emok*s Yorkshire puddings!

..an attempt to copy my favorite chef's recipy of Yorkshire puddings...they dont look like his at all, but they tasted great!!


Sunday, July 18, 2010

Thai Lotus cakes- Khanom Dok Bua


..you either love them or hate them!

This cake is  a cake but with a snackie feel to it- as a Thai woman once told me when I asked her about the cakes : "Mm..this is a very old cake! It's good to eat when watching tv! Break it into little pieces and munch on it!"

(I still wonder what the "old" about it was- presumably she meant it was an old recipe!)

Anyways this cake is a bit of an obsession with me. I saw the first ones in a small shop/ restaurant kind of place very far out in a small place called Stenløse- and I bought a bag of them with me home and was completely blown away- with the presentation and with the taste and the crunchiness and texture! I since was so lucky to get my hands on the iron to make it and have been experimenting to get them just right ever since!


Recipe:

Equal amount of Coconut milk and water
1 kg rice flour with a tiny bit of normal flour in it ( makes them harder and crunchier)
500 or more palmsugar or light brown suger ( gives a better taste)
1 egg
salt
Sesame seeds

 Mix it well and leave it for some hours or even better till the next day. The consistensy has to be like when you dip a spoon in it and lift it up, the batter drips off very slowly and mostly stick on the spoon.

Cooking the cakes:

Heat oil up in a large thick buttomed pot or a large vok- heat the iron up too- and this is the essential in the baking of the cakes- the iron has to be warm enough or the cake wont come off but will stick to the iron.

When its warm enough- sprinkle sesame seeds on the batter for every cake ( or they will sink to the bottum) and dip the iron in the batter- quickly and making sure you don't dip the top of the iron ( or the cake can't come off) and place it in the hot oil, and just as the cake "stiffens" shake it off and turn it upside down. Take the cake out of the oil before it turns too dark and place it in a glass or bowl lined with tissue to absorb the excess oil and press them down a bit, to make the rounded shape. Leave them to cool- and store them in an airtight comtainer- but not till completely cooled off.


Ps. Please- if anyone out there knows this cake, the real name of it and another recipe- please let me know!!

Wednesday, May 12, 2010

Does frying pans dream of electric pancakemachines?


I usually makes small springrolls, but this guy at work, Long made the most fantastic huge springrolls, with his own springroll wrappers and home made chili sauce, so I started experimenting to make them like his. I never succeeded even after quite a few attempts, so Long is still the Springroll Master, but mine didnt turn out that bad even so;)

First I prepared the filling with minced meat and other stuff ( Long says meat and cabbage and stuff..I think I was rebellious and used meat and bamboo and onions) and salt and peber and left it to cool.

Springroll wrappers:
Mix eggs, salt and peber, water, flour ( 1 eggs to 300 gr of flour approx) into a nice smooth, not too thick not too thin...and leave it for a while. Bake the pancakes on a pan - on only one side! I brushed the pan with a tiny bit of oil when needed and poured the batter on and baked them on one side till they look like they were just baked, not browned yet. The I peeled it off the pan and proceeded to the next one. I left them to cool completely off before rolling them.


I deepfried the ones we wanted to eat and put the rest in the freezer. Very easy to take them out, thraw them and deepfry them if we feel like some warm crispy springrolls!

AND now we're at it...I want this springroll  machine for my birthday! That has to be better than sex!!


or this one


then check out this dream of a machine !!

Friday, April 2, 2010

The day Lukas came by

Sweet lille Lukas and his mother came by one Sunday afternoon, so my daugther and I baked some cookies and cakes: Kokos Makroner, Chokolade Snacks, Sukkerkringler and the delicious Gitzes Mini Muffins.


Gitzes Mini Muffins!


My daugther Regitze is very interested in cooking and baking and has been engaged in cooking like folding springrolls and making soups and cakes since she was 7-8 years old. Today she is 11 and these are her fantastic Mini Muffins:
Recipe:
3 eggs
2 dl sugar, prefereble ecological sugar cane sugar ( we dont use the white refined sugar- not much taste or soul to it!)
2 dl. flour ( again here she used ecological flour)
1 1/4 dl sunflour oil ( we use oil instead of butter as its less unhealthy than butter;)
1/2 teaspoon salt
1/2 teaspoon baking soda
1 teaspoon of vanilla sugar ( if you dont have the right stuff)
Rind of 2 lemons ( make sure they are ecological, so you dont eat all the fertiliser poison stuff they spray with)
1/2 dl juice of a lemon

Icing sugar for sprinkling on top when they are done

Mix everything together, dont whisk it but stir it loosely. Regitze started with adding the eggs, then sugar, the flour, salt, baking soda, vanilla, oil and then the lemon stuff. Pour it into small mini muffin moulds, in a mini mufifn paper cup and bake them till just firm and slightly brownish in a 180 degrees oven.

Serve them sprinkled with a bit of sifted icing sugar or make a lemon icing for them. They are delicious!

Kokosmakroner:


These coconut macroons made with egg whites, sugar, grated coconut and marcipan and coated with dark chokolate are really nice when eated on the same day as they are baked. They are surposed to be crispy on the outside and soft and moist on the inside- so dont bake them too much! I found this recipy in my daugthers cookbook and its actually quite nice;)

Recipe:

2 eggwhites ( use the pastorised to make sure you avoid samonella)
100 gr sugar
100 gr grated coconut
25 gr pure macipan
100 gr dark rich chokolate

Mix eggwhites and sugar well together in a  bowl, grate the marcipan and add it. Leave for at least 30 min.
Make 16 spoonfull of the mix on a baking tray ( use baking paper or it will stick), press them into shape with your hands and bake them at 175 degrees for about 15 or until slightly lightbrown.

Cool them off and when cooled dip the bottom of the macroons in melted dark chokolate of a good quality. Leave to cool and serve when completely cooled off.

Keep them in an airtight container if you have any leftovers.)


Chololate Snacks:


These chokolate snacks are very fast to make and extremely easily done- you can make it anyway you want it so there is no real recipy, but here is what I did on that day:

Wanna be recipe:

Dark chokolate ( rich dark and with a large % of chokolate beans)
Corn Flakes

Melt the chokolate- I have to admit I just throw the chokolate into a big thick bottomed pan and smelt it slowly, stirring all the time. When its all melted and cooled off for a minute or two ( it shouldnt be too hot as it will soften the cornflakes  or too cold as then it will stiffen when the cornflakes gets in) stir the cornflakes carefully ( dont break them) and pour the mix into little paper cups. Cool off and eat!

Keep them in an airtight container after cooled off completely.

You can use milk chokolates as well or mix the two that makes it very nice- not too sweet ( as I tend to find milk chokolate) and not too bitter ( as my kids tends to find the dark chokolates, which are my favorite). You can stir in roasted nuts ( unsalted ofc), coconut, candies fruits with the mix as well.

Sukkerkingler:


This in an very old Danish recipe for Sukkerkringler which I found in a book from 1922. In Jutland where I once lived ( its a part of Denmark) they have coffee breaks at all times of the day, all with the name of the time of day : "Formiddags kaffe" ( before noon coffee) "Eftermiddags kaffe" (afternoon coffee) "Aften kaffe" ( evening coffe) and always served with homebaked  "Småkager". Its a very nice ( and fattening tradition) and while living there I tasted these Sukkerkingler which the old grandmother made to perfection and never forgot them. I have looked for a good recipe ever since, and this one are ok, even though not as nice as the old grandmother of the Kjeldsen family. Her Sukkerkingler were very thin and extremely crisy and I dont think anyone else in Denmark can make them as she did.

"Småkager"  are a variation of Danish cookies ( there are so many!) which are little cakes basicly baked with butter, sugar and flour. Today most pleople buy them, but before ( and in my mind mostly in Jutland;)  everyone made them- big batches so they'd last for some time and for all the various coffee breaks.

Recipe ( taken from the old book from Carla Meyer):

500 gr flour
1/3 teaspoon of hjortetaksalt ( which is a baking agent used only for biscuits and cookies)
250 butter
1 1/2 dl of fresh fullfat cream

Sugar to roll the kringler in

Pour the flour into a large bowl, cut the butter into pieces and mix it with the flour and cream loosely till a dough. Leave it for a few hours, then devide the dough into a lot of pieces and roll each and form into a pretzel form and press them into the bowl/plate of sugar so the sugar sticks onto the cookies.

Note: its important to mix the dough loosely so it will become crumbly and crispy when baked.

Place the kringler/pretzels on a baking tray and bake in the oven untill sligthly browned. The recipy is as random as me as it says: "on modarate heat untill the end where you turn the heat up until the sugar starts to caramlize". I think I put the oven to 200 max.


Wednesday, March 10, 2010

Moroccan filled msemen a la Ganda!

I tried this Moroccan filled bread at an event at my daugther's school, every family brought food for a big joint dinner and one of the mothers was from Morocco and had made this wonderful food. I fell completely in love with it and went home and tried it out the next day or so! So here is my version of the Moroccan Mseman or  Rghaif - the filling isnt original, but I found it worked for me;)


Recipe for the dough ( which I found on the net) :

4 cups of flour
1 cup of semolina, fine
2 teaspoon salt
2 teaspoon sugar
1/4 teaspoon yeast
1 3/4 cup warm water

My own Filling:

A mix of minced lamb and viel- fry up with garlic, lemon peel, lemon juice, salt and peber and a touch of cummin and some lemon juice in the end. Leave it to cool off, add chopped parsley.


How to make them:

Mix the dry ingredients together first then mix in the wet ingredients. Mix/kneed well and leave for 30 minutes. Roll into little balls and leave them for 15 min. Then spread them out- dont use a rolling pin but use ur hands with a mix of oil and butter or just oil- with the filling as shown below.
After having made one ball into a packet- make another ball into a square and place the already folded package on the second wrap/ square with the folded sides down and fold it. So each packet has been wrapped twice!

How to bake them:

Leave the folded msemans for 15 min, then place one at the time on an olied surface and strech it, like when you made the mseman/ wraps/breads in the first place- do it carefully so you dont break them ( too much, its hard not to break them at all, for a beginner anyways) - stretch them with ur olied hands and bake them either in the owen or on a pan like I did, at moderate heat.


I cut mine out in four pieces each and ate them with fresh parlsey- really good. Not as good as Mounas..but still good! Its surposed to be crispy on the outside and chewy on the inside.

I have to say..it took it's time..and wasnt just as easy as Mouna told me ( she proberbly made it a million times) but it wasnt as hard as I thought it would be and it was really worth the effort! I read somewhere that they eat msemen with all kinds of fillings: spinach, onion,  or just eaten freshly baked with a dash of honey enjoyed with a nice cup of tea.


Wednesday, January 27, 2010

Winterfood- Flæskesteg


Flæskesteg- roast pork the Danish fashion with bayleaves and salt.We eat it with Brown potatoes (caramelled small potatoes) , white potatoes, lots of gravy, picked redcabage and hmmmm...the crispy crispy skin is the best..and always reminds me of xmas and winter and snow and mmmm...


When the snow is falling..its time for homemade waffels


When the snow is falling and the kids walk hom from school for the first time alone  in the white and crisp snow and their cheeks are burning red from the cold,  its time a good mummy gets up and makes hot chokolate and waffels with whipped cream and blueberry jam.)


I make a dough of eggs, milk, a tiny bit water, a pinch of salt, sugar, vanilla and some flour, and small teaspoon of baking powder- mix it up well and then add some melted but cooled  butter and mix it in. Let it stand for half an hour before cooking the dough in your waffel iron. I use an old fashioned one, the kind you put on your stowe and turn around as u bake it. Its messy and more work, but its good..like good wafels should be;)

An old woman I have known all my life told me a trick from the southern part of Denmark where she comesa from: put a couple of spoonfuls of snow in the dough just before baking it- makes them fluffier and crispier!

Sunday, January 17, 2010

You take one duck and inflate it!

Peking duck! This has to be the silliest thing I ever cooked. The recepy  it self was sooo funny..starting with the following instruction:’ You take the duck, dry it up, inflate the duck with a bicycle pump.... ‘. It took me days and it was so much trouble for a little housewife like me- but it was worth it. It didnt presented itself  like a real Peking duck, but then again..I am just a housewife;) But I read somewhere to my own consolation that a Peking Duck chef works for 10 years before actually getting to cook a duck! Its an art! This is my homemade art:

Anyways..so I took the duck...dried it in front of a ventilater for a day or so..inflated it..and NO..the bycycle pump didnt work, so I just sort of blew some air in with a straw. The trick is to get the skin as crispy as u can and still have the meat as tender as can be. When you dry the surface of it..the skins starts to loosen from the skin and the reason why you force air in is to make a pocket of air between the skin and the meat. Then I basted it in some sauce and cooked it and voila..served with spring onions, hoisinsauce, and cucumber- and not to forget the mandarin pancakes to roll it all up in...mmmm....its sooo good once you had it, you will always want more! In real Peking Duck kitchens you get the meat and the skin served seperately- the skin is so crispy its unbelievable and the meat so tender and moist! My skin wasnt that succesfull so I just sliced the duck very thinly;)


Apetizers with olive tapernade

So this is a little snack to be served with a drink or just as an appetizer- they are quick to make, you can freeze the unbaked rolls and thraw them just before you bake them! Easy and tasty and looks so good;)


Get a roll of Puff pastery, lay it out flat on the table. Take a jar of black olives ( they are more deocorative) mix it in a small blender with a clove of garlic, a few pieces of sundried tomatoe, some lemon juice, some lemon peel, a pinch of salt or a few salted anchoves and some red chilie if you like;)

 Blend and spread out on the puff pastery- and roll it up. Leave it cool for a couple of hours till cold and harden- then cut it out thinly and bake in oven will light brown and crispy.


Saturday, January 16, 2010

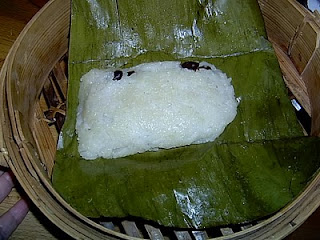
Sticky Rice with banana and black beans


Sticky rice in bananaleaves- also called Khao Tom Madt in Thai is a very common snack/dessert you can buy from streetvendors. They taste wonderfully sweet from the coconut milk, the soft ripe banana and then the contradiction, which is so common in Thai food:  little salty black beens in the middle of all the sweetness.

Thai desserts/ snacks are often this funny combinations of contradictions: sweet/salty/sour/.
Sticky rice ( glutinous rice) is eaten in many different ways- sometimes you roll it to a ball and dip it in sauces, sometimes its steamed in bananaleaves and fílled with sweet or savoury things- like here banana and black beans and sometimes, rolled to a triangle with chicken, beans and hot stuff. I have read somewhere that sticky rice makes you very tired so never eat a handfull or you'll be very tired! But if this is actually true or not I dont know;)


Here is yet one of my unprecise recipies:

1 kg Sticky / Glutionus rice
1-2 cans of coconut milk
Sugar (sugar cane sugar or palm sugar) lots of it

Some salt

Black salted beans

Bananas/ plantaine

Banana leaves ( to steam in.)

The rice:

1. Leave the rice to soak in water for 5-6 hours.

2. Steam them in a bamboo steamer i a nice even layer on some damp cloth or some baking paper for about 30-40 minutes.

3. Cook the rice with coconut milk, sugar and salt to taste ( it has to be sweet yet a tiny bit salty) cook untill all the coconut milk has been absorbed in the rice. They shouldnt get too hard or too soft- they must never be soggy!

Preparations of the leaves and wrapping:

 1.Cut the leaves into pieces that are appropiate, put them in the sink, pour boiling water over them and dry them carefully with a clean cloth. Grease the pieces of leaves so the rice wont stick to them.


2. Place a suitable layer of rice, a little piece of banana and some beans in the midle then rice on top. press it together to a small cake and wrap the package as you see on the picture. Continue till you run out of rice.


The Steaming:

Place the wrapped rice in a bamboo steamer and steam them till they are done- maybe 10-20 minutes, depending on the size.

You can freeze them and reheat them in a steamer or the microwave- this snack takes so long to make it seems more economic to make a lot of them and freeze them;)